
(Please note some of the internal links are in Spanish)
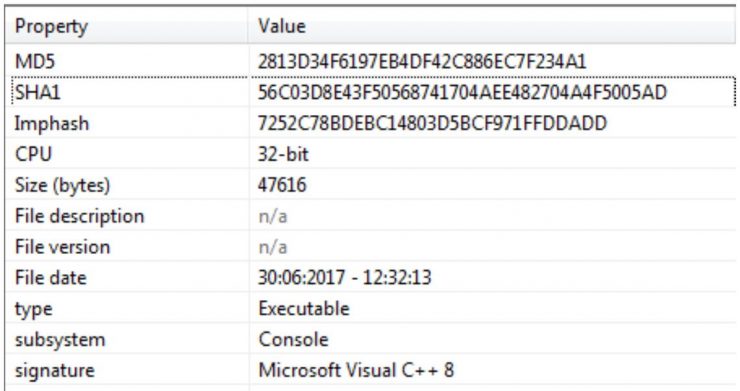
One of the things that most caught our attention from the #NotPetya malware lab is the module that appears to contain code from the mimikatz tool. It is an automation of the process of any pentest that we believe is worth studying and treat it with love, to learn.
For the analysis we focus on the 32-bit version of the binary:
 [Read more…]
The mimi (mimikatz) side of #NotPetya
7 de July de 2017 Por
The Evolution of Trickbot
6 de July de 2017 Por
 From the malware lab of S2 Grupo we have been monitoring the movements of a Trojan known as Trickbot. Its relationship with Dyre, another older Trojan with which it shares many design features, and the speed at which it evolves, has captured our interest ever since we saw the first samples.
This malware is usually categorized as a banking Trojan since it has so far been very oriented towards data theft relating to banking, but its modular design allows to expand its capabilities at any time so as to perform any kind of extra action.
During its early versions, some very good analyses were already done such as those of @hasherezade in the malwarebytes blog and Xiaopeng Zhang in that of Fortinet. But the development of Trickbot has continued during the last few months, reaching version 17 in less than 6 months. So we thought that it would be interesting to check the changes it has undergone during its evolution and to delve deeper into some of its most curious techniques when performing different actions.
[Read more…]
Honeyspider 2.0 – Workflows
23 de May de 2013 Por
Some time ago we wrote about HoneySpider 2.0 and we made a quick look at its functionalities. Now let’s see one of the key pieces of this new version: workflows. We assume you have already installed HoneySpider 2.0 or that you are using the virtual machine provided by the project.
Given that we already have the application installed, first of all we have at hand the necessary documentation to define a workflow, which can be found here and here.
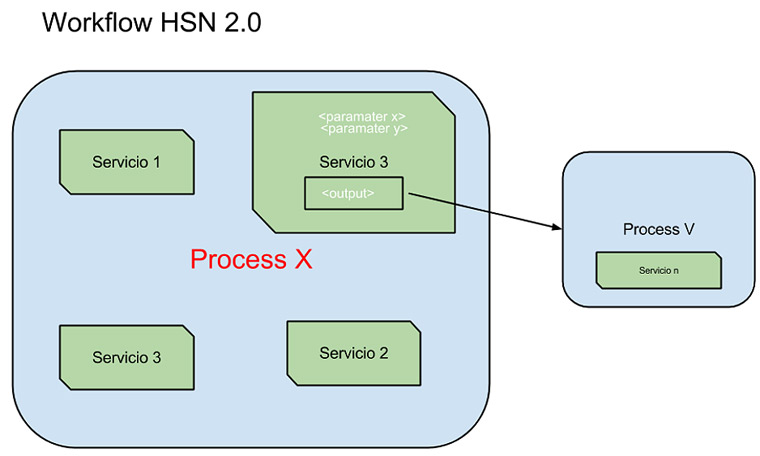
A workflow in HoneySpider 2.0 is composed of a series of processes, where each process is composed of services. These services contain input parameters and the ability to redirect its output to other processes. Let’s see a conceptual scheme of what is a workflow:
These workflows are defined in XML format. The following example will provide you with a very simple example workflow that performs a file analysis with rb-officecat (Nugget razorback) of the Office documents located in a set of web links:
<?xml version="1.0"?>
<workflow>
  <description>
    Analyze files office files with officecat
  </description>
  <process id="main">
    <service name="feeder-list" id="feeder">
      <parameter name="uri">/tmp/file.txt</parameter>
      <parameter name="domain_info">true</parameter>
      <output process="process_url"/>
    </service>
  </process>
  <process id="process_url">
    <service name="webclient" id="webclient0" ignore_errors="DEFUNCT">
      <parameter name="link_click_policy">0</parameter>
      <parameter name="redirect_limit">20</parameter>
      <parameter name="save_html">false</parameter>
      <parameter name="save_images">false</parameter>
      <parameter name="save_objects">true</parameter>
      <parameter name="save_multimedia">false</parameter>
      <parameter name="save_others">false</parameter>
      <output process="report"/>
    </service>
    <service name="reporter" id="reporter0">
      <parameter name="serviceName">webclient</parameter>
      <parameter name="template">webclient.jsont</parameter>
    </service>
    <!-- determine classification, taking into account propagation from child objects -->
    <script>!findByValue("parent", #current).
      {? #this.origin != "link" and #this.classification == "malicious"}.isEmpty
       or rb_officecat_classification == "malicious"
       ? (classification = "malicious") :
         (classification = "benign")</script>
    <service name="reporter" id="reporter1">
      <parameter name="serviceName"/>
      <parameter name="template">url.jsont</parameter>
    </service>
  </process>
  <process id="report">
    <service name="reporter" id="reporter4">
      <parameter name="serviceName">webclient</parameter>
      <parameter name="template">webclient.jsont</parameter>
    </service>
    <service name="reporter" id="reporter5">
      <parameter name="serviceName">file</parameter>
      <parameter name="template">file.jsont</parameter>
    </service>
    <conditional expr="content != null and (mime_type == 'application/msword' or
         mime_type == 'application/vnd.ms-excel' or mime_type ==
		 'application/vnd.ms-powerpoint')">
      <true>
        <service name="rb-officecat" id="office1"/>
        <service name="reporter" id="reporter6" ignore_errors="INPUT">
          <parameter name="serviceName">rb-officecat</parameter>
          <parameter name="template">rb-officecat.jsont</parameter>
        </service>
      </true>
    </conditional>
    <!-- determine classification, taking into account propagation from child objects -->
    <script>!findByValue("parent", #current).
    {? #this.origin != "link" and #this.classification == "malicious"}.isEmpty
       or rb_officecat_classification == "malicious"
? (classification = "malicious") :
         (classification = "benign")</script>
    <service name="reporter" id="reporter7">
      <parameter name="serviceName"/>
      <parameter name="template">url.jsont</parameter>
    </service>
  </process>
</workflow>
This workflow example should be interpreted as follows: we define a main process that uses the service “feeder-list“. It reads the links to be analyzed from a file located in /tmp/file.txt. The links are passed to the process_url process. This process uses the service “webclient” to visit those links, getting as a parameter some actions it should do or not to do, such as saving multimedia objects, and so on. The links collected for this service will be passed to the report process.
Besides webclient, the process process_url has several services that generate output information for the web interface. Finally, the report process is where the service that scans the Office files with the razorback nugget, “rb-officecat” is located, besides printing information using the service report. We want to emphasize the importance to set which content must activate the service. In this case it has been limited to start running only with contents that apply.
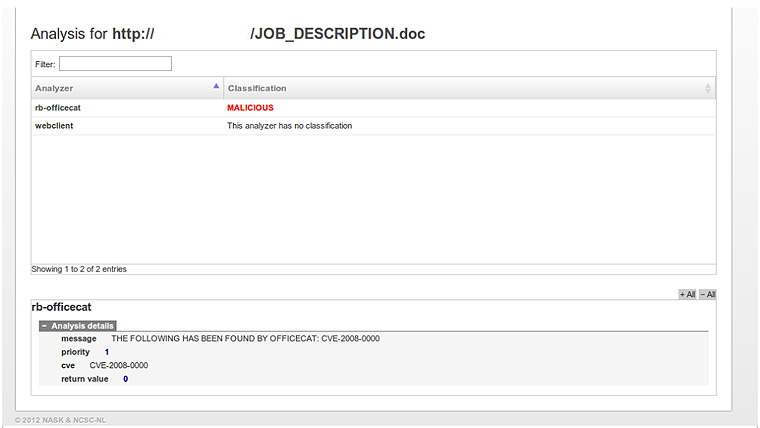
After loading the workflow in our tool, we input it with a file with links. In our scenario we have included a link to a malicious office document, resulting in:

If we click on the detected document we will see the vulnerability detected by rb-officecat:
This is just one example of the detection abilities of this tool. As seen, the definition is simple and as we discussed in the previous post (ES) it has great possibilities. At this moment it is in an early stage and certain aspects will require fighting to get them to work as we want, but you can also report the problems in the Google group of the tool.
JavaSnoop – Debugging Java applications
20 de February de 2013 Por
(Please note this post was published last 12th sept. 2012 in the Spanish version of this blog)
Recently we used a very interesting tool to analyze Java applets: JavaSnoop, developed for BlackHat USA 2010 by Arshan Dabirsiaghi. Broadly speaking, the tool allows us to adhere (attach) to a Java process or start it and intercept the calls made. In addition to intercept these calls and view its contents, we can change the arguments of the methods we are intercepting and modify the return value of the function.
Let’s see how to intercept a Java applet method:
1. Download the latest version of the application: http://code.google.com/p/javasnoop/downloads/list
Note: It is recommended to install the application in a directory that does not contain spaces on Windows (eg C:\JavaSnoop).
2. Download the latest version of Java SDK (requires restart after installation).
3. Set the location of the JAD binary in ““Settings > Manage JAD > Set jad path””. Download from the author website. This will allow us to decompile the classes.
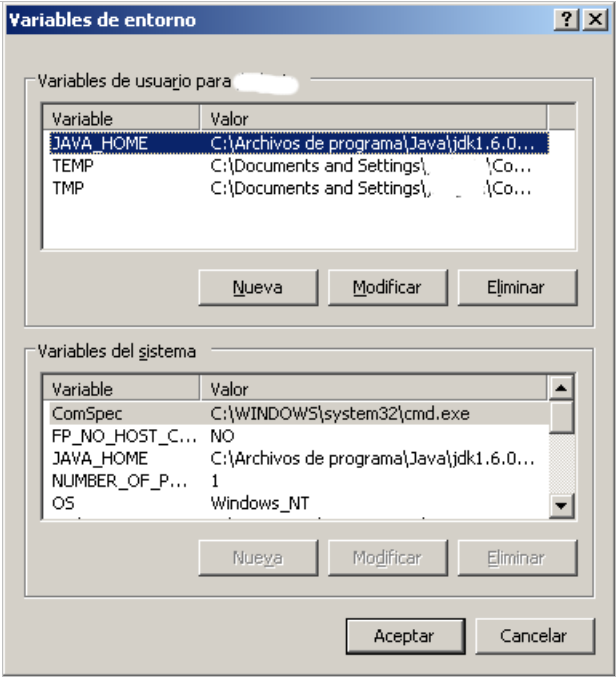
4. We make sure that the JAVA_HOME environment variable for our user is set.
5. To avoid problems with permissions when injecting, JavaSnoop contains in the Resources folder the file unsafe.policy. We copy this file to %USERPROFILE%\.java.policy. This directory should contain a file .java.policy. After our analysis is recommended to restore the initial configuration.
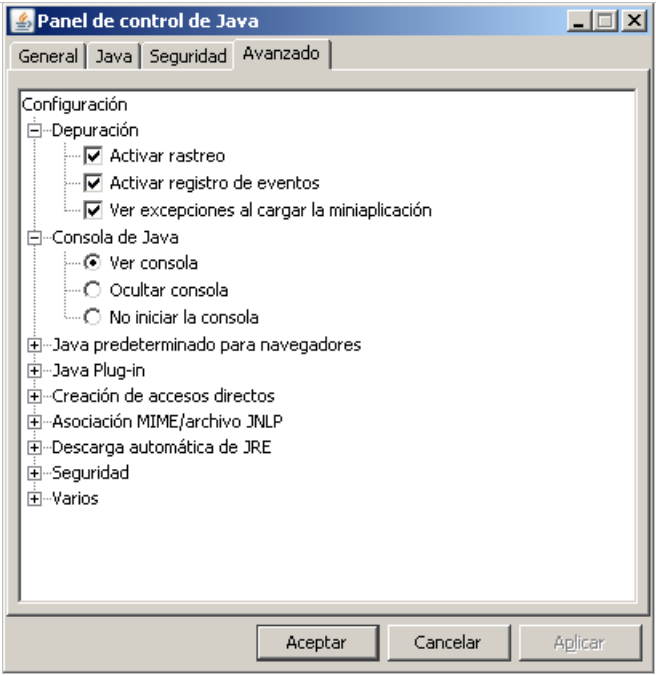
6. It is advisable to activate the Debug Console in Java and keep it active for messages.
7. It is very important the order in which JavaSnoop and the java application are started. With some applets is strictly necessary that JavaSnoop is running before launching the browser.
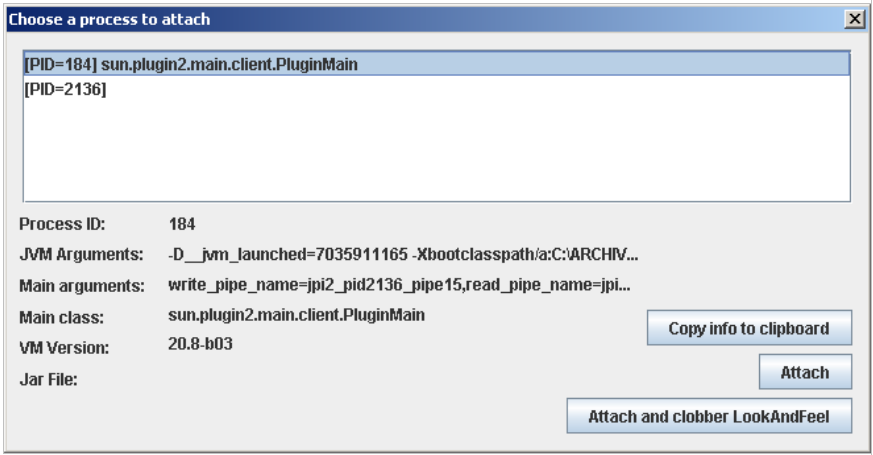
8. Once started JavaSnoop we use the feature “An existing process“. In this case we see the PID 184 which is an applet that we started in Internet Explorer. Then hit the Attach button to adhere to process 184:
9. Once we have adhered to the process, we will set a “New hook“. To do so, click on the “Add new hook“. If you still do not know what class and method you want to hook, go to Browse, what will open a new window where you can select the class you want.
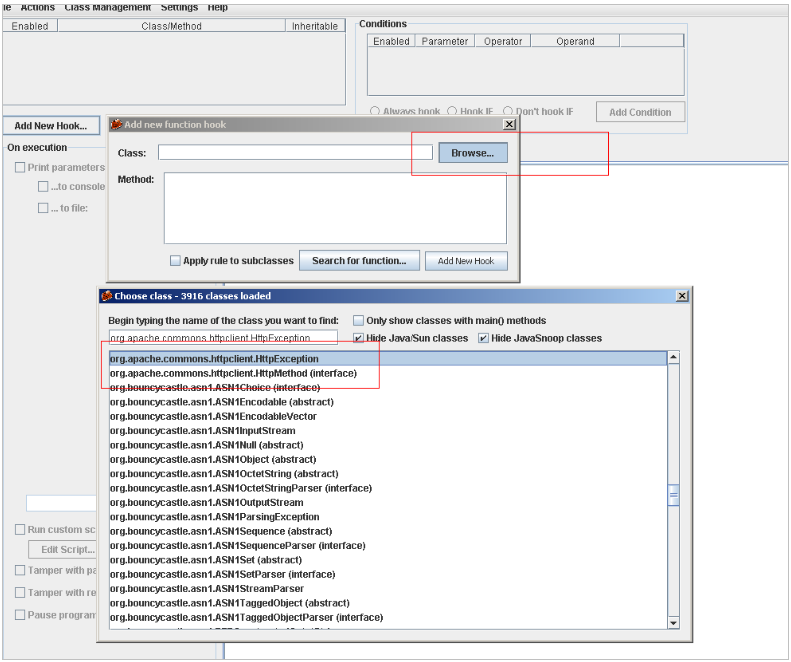
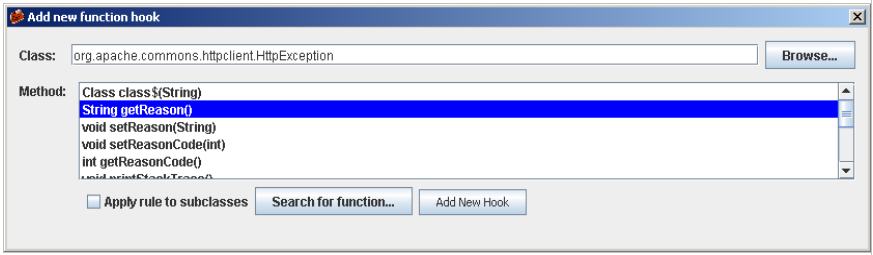
Now we select the method we are interested in:
Once selected the class and the method, we go back to the main window:
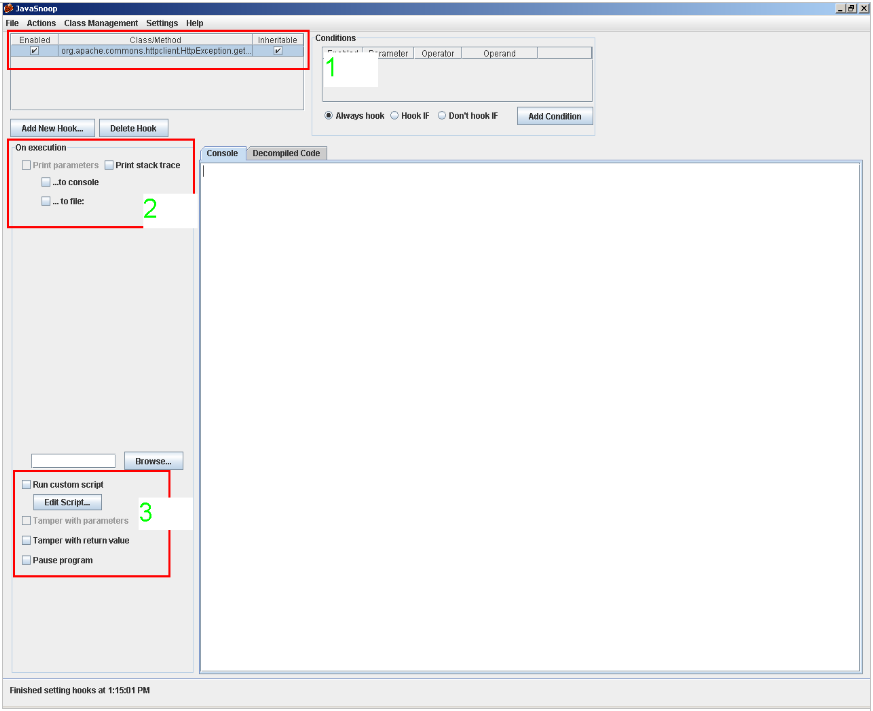
In this window, if we have selected the method (point 1) we will be able to set the actions to be undertaken by JavaSnoop: print the parameters when the method is invoked, print the contents of the stack, modify the parameters that are passed to the function and the return values. (points 2 and 3).
10. We can also see features of the process that we have attached to in the Actions menu.
With these steps, you are ready to intercept any Java application in a simple and fast way.
Customizing “Cuckoo Sandbox”
23 de November de 2012 Por
(Please note this post was originally published in the Spanish version of Security Art Work last 19th Nov 2012)
As many of our readers will already know Cuckoo Sandbox is an application for the automatic analysis of malware. The installation process in the current version of the sandbox is quite simple and has been described by other blogs in a very detailed manner. Once we have already installed sandbox, it will give us reports, such as the ones found in the malware analysis service hosted on Malwr, about the behavior of the malware, on the imported APIs, the results from virustotal, packer used, etc.
In this post I would like to emphasize the “real power”, from my humble point of view, of this sandbox, power that lies in the modular design that have made its developers and in the simplicity to develop modules for the automatic analysis of malware, making it a highly customizable Sandbox.
The design includes the following types of modules:
- Machine Managers: modules to interact with the virtualization software, mainly vmware and virtualbox.
- Analysis Packages: modules to deal with the different types of packages (packages: exe, bin, pdf, etc.).
- Process Modules: modules that define the actions that are launched on the results (pcap, etc.) collected during the phase of analysis and execution of the malware.
- Signature Modules: modules to define signatures to be applied on the final results (“Process Modules“) of the previous phases.
- Reporting Modules: modules to display results.
As we can see, the range of actions is very broad; we can add support for a new hypervisor (for example, we could add support to simulate Android) or to define how we want the information be displayed in our control panel with the design of a reporting module.
As I see it, the application design allows fast and easy writing of modules (at least signatures that has been what I have tried). Below I show two examples created quickly that have been added to the project (you can download all the signatures of the community with the “utils/community.py” utility):
- CreateRemoteThread: detects code injections with CreateRemoteThread.
- BOT Ruskill Mutex: detects a mutex of the bot Ruskill by what we have seen in different samples executed in the Sandbox.
As you can see the power of customization it is very high and if Cuckoo roots in the community, will be a very serious alternative for automatic analysis of malware.
TCPdump DROP privileges
18 de June de 2012 Por
I’m sure many of you know tcpdump and use it frequently. As we all know when it is run without privileges to capture packets on a network interface it displays the following message:
$ /usr/sbin/tcpdump -i eth0
tcpdump: eth0: You don't have permission to capture on that device
(socket: Operation not permitted)